The channel palette in Photoshop
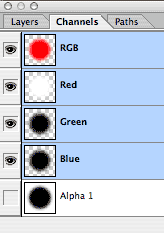
The pixels in an alpha channel will be either white (transparent), black (opaque) or a shade of grey (semi transparent).
When an image with such an alpha channel is combined (or composited, or blended) with another image (or video clip or image sequence/animation), the pixels in the alpha channel can be used to determine which portions of the image are transparent and to what extent.
What are alpha channels used for?
Alpha channels are used for 3 primary purposes ...
- To aid image editing (selections, masking, rendering filters etc) on image files within Photoshop (and other pixel image editing applications).
- To blend combinations of animations, still images and video clips together in video and animation applications (also known as compositing).
- To help graphic designers blend images and text in QuarkXpress & InDesign.
NOTE: Clipping paths achieve similar effects for graphic designers who need to control the way text flows over an image in a DTP page layout application (such as QuarkXpress or InDesign).
Alpha channels in Photoshop
You can find out how to create and utilise alpha channels in Photoshop by using the Help menu and manuals. You will find alpha channels useful for ...
- Saving selections
- Creating masks
- Using the Render>Lighting effects filter
- Preparing files for Director, Final Cut etc
etc
IMPORTANT NOTE: If your image is an irregular shape and placed on a transparent background, applications such as Final Cut Pro and Director will automatically extrapolate (create) alpha channel/transparency information for every pixel in the image.
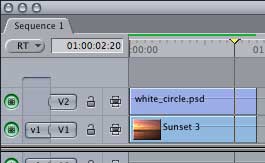
Using an images "automatic" alpha channel:
Here's an example using Final Cut Pro and an
image of a white blurred circle.

Alpha channels in video editing
In video editing, alpha channels and mattes are closely related ...
An alpha channel (as we already know) is a fourth channel in an image which contains information about which areas should appear transparent.
A matte is a filter, generator or image file with alpha channel information that you apply to a video clip to determine which areas of the clip will become transparent. Mattes can be simple geometric shapes or complex selections.
There are already too many good tutorials on the web and in manuals and magazines to start writing more here, and this is a complex subject ... but here are a couple of good examples of the use of alpha channels to produce matte effects ...
Using an images "automatic" alpha channel
A few years ago, if we wanted to make an image blend beautifully (anti-aliased) with a background, we used to have to create an alpha channel in Photoshop which defined the transparent and opaque parts of the image.
We no longer need to do this manually as many programs including Director and Final Cut can extrapolate alpha channel information from the image itself.
- Create an image on a transparent background in Photoshop.
- Place it on a video track above a video clip. It should blend beautifully with the video behind it.
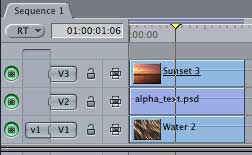
Using a travel matte alpha:
Here's an example with a clip of water and
another of a sunset composited together using
a Photoshop file to behave like an alpha
channel and produce a matte effect.

Using a travel matte alpha
This is a technique for blending 2 clips together.
- Create a Photoshop file of some black text on a transparent background.
- Place it between 2 video tracks.
- Set the top most video track to a Travel Matte - Alpha composite mode.