Types of scanner
There are 4 pre-eminent types of scanner.
-
Flatbed scanner. These are the familiar type you will find an any computer store. They are suitable for office / business, home, and design for the screen applications (web sites and multimedia). Even the most expensive (prices range from under £100 to many thousands) are not always suitable for high quality print applications despite having so called "transparency hoods" allowing them to scan photographic transparencies.

-
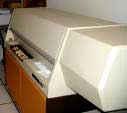
Drum scanners (highest quality) . These are used to scan photographic transparencies for high quality professional print repro. They can be found in print bureaus where each scan is charged for. Costing tens of thousands of pounds, you won't be buying one of these for home use!
-
Slide scanners (intermediate quality but still good) . Used to scan transparency slides. A photographer will use a high quality drum scanner if possible, the next best thing is a slide scanner or a flat bed scanner with a so called slide "transparency hood". These are more affordable.
-
Handheld scanners. For office use only.
Scanning for the screen
If you are scanning images to be used on-screen in web sites or multimedia productions, scan in RGB mode at 72dpi for same size. All "domestic" or low-end flatbed scanners can only scan in RGB mode anyway but even the cheapest model will give results which are more than adequate for multimedia and web projects.
Scanning for print
This advice is good for flat illustrations and photographs.
What resolution should I scan at?
Magazine quality offset litho printing has a resolution of 150 lpi (lines per inch). The dpi equivalent is approximately twice that at 300 dpi.
If you intend to use an image at its original size, scan at 300 dpi. If you intend to reduce the size of an image when you incorporate it into your artwork layout, for example by half, scan it at 150 dpi. If you intend to enlarge the size of an image when you incorporate it into your artwork layout, for example to twice its original size, scan it at 600 dpi.
What colour mode should I scan in?
Most affordable scanner's scan in RGB mode. If the image is to be used for print remember to convert it to CMYK mode in your image editing program.
You can't check colour balance on a monitor
Also remember that no matter how good your images look on screen you will not know how they will print until you buy a high quality proof.
Remember also to always save scanned images in native file format (usually Photoshop) for future tweaking, before saving them in any necessary interchange file format.
Scanning printed images
What is Moire?
When scanning images which have been printed (pretty well anything other than a photograph has been CMYK printed), the pattern of printed dots can clash with the scanning process causing an interference pattern known as moire. Use the de-screening features of your scanning software to correct this during the scan.
| Image after de-screening | Image without de-screening |
|---|---|
 Image which has been de-screened during scanning. |
 Image which has not been de-screened showing Moire. |
Correcting a scanned image
Providing your screen has been correctly calibrated for colour and contrast / brightness, you may well find that scanning alters the image. If you are optimising an image for print you will need to follow a complex process of correction allowing for the particular printing system to be employed for duplication and the type of printing stock to be used. It is beyond the remit of this article to cover these issues in depth, but it may interest budding designers to know that many graphic designers leave these processes to the printer, providing them with Quark layouts containing so called “positional” scans only.
Developers scanning images for the screen need only satisfy themselves that their both images appear adequately cross-platform on Mac and PC monitors (remembering that PCs display colours darker and richer). There are however several useful Photoshop techniques for ensuring an image appears as near to the original as possible.
-
Setting the highlight point and shadow point. This ensure correct contrast across the image and can be done in the Levels dialogue box.
-
Unsharp mask. A filter which can emphasis differences between contrasting pixels to create the illusion of greater detail.