Web video
Adding audio and video
to web site concepts
Preparing / optimising /
compressing digital
video files
Adding video to web
sites & multimedia
Real Time & HTTP
streaming concepts
Video upload sites
Flash has become (2009) the preferred method of delivering video in web sites. The popularity of the Flash Player browser plug-in (pre-installed on almost all personal computers) means that web designers need only create and publish Flash Video files whereas previously they needed to offer a combination of QuickTime and Windows Media Player video to ensure they reached the widest audience.
The Flash player is not yet installed on 100% of computers but statistics suggest perhaps 85-95% are capable, and for most web designers that is enough, especially if users without it see a prompt to download the Flash player if they don't yet have it when they try to play a file. It is true that many end-users will be surfing from work or school and not have adequate access privileges to authorise installation but it is generally felt that they are an acceptable minority.
This page gives a brief overview of the processes you need to complete to prepare and publish Flash video file to a web site.
Method 1 - Creating a bespoke Flash audio player console
Using Flash, Flash Video Encoder and ActionScript you can author a unique console for playing back video files. Because this is an involved process and there is an easier alternative (Method 2 below), this method is not often used. However, it does give the designer the opportunity to create a truly unique video player interface.
Once the Flash movie has been created it can be added to a web page.
Method 2 - "Embedding" a Flash video file
This method does not require the use of the main Flash application or any ActionScript. Flash video files (.flv) can be created with the Flash Video Encoder app and then "embedded" into a web page with a choice of preset playback control "skins".
How to do it
1. Create your video edit
Transfer video clips (rushes) from a camcorder (DV?) to your video editing application (Vegas, Final Cut, iMovie, Premiere etc) and create a finished edit. Save the completed edit as a single file in the format you imported and edited it in (DV?). Do NOT compress or convert it to another lower quality format at this stage.
2. Create a Flash video file (flv)
Import the finished edit into Flash Video Encoder, or an alternative such as the freeware ffmpeg encoder, and compress/optimise it, saving it in .flv format into the appropriate media folder in your local site.
Here are our suggestions for (Flash video encoder) settings ...
| Flash video settings for broadband | ||
|---|---|---|
| Value | Comments | |
| Frame size / aspect ratio | SD (4:3) 640 x 480 or 600 x 450 SD (16:9) 640 x 352 or 720 x 396 SD (16:9) web upload (YouTube) 720 x 396 |
For SD 16:9 DV, you MUST convert your video from 4:3/16:9 anamorphic to the actual physical DV 16:9 pixel aspect ratio. Highest quality for video upload (YouTube) because files will be re-encoded, use native settings where possible. |
| Frame rate | 12-15 fps. Use 25fps for fast action video. | Highest quality for video upload (YouTube) because files will be re-encoded, use native settings where possible. |
| Deinterlace? | Yes | |
| Video codec settings | ||
| Codec | Sorenson Spark for best compatibility. On2 VP6 for newer computers and Flash plug-in versions (last 2 years). H.264 for latest computers (2010) & Flash plug-in versions. |
Highest quality for video upload (YouTube) because files will be re-encoded, use native settings where possible. |
| Quality | High | |
| Keyframe | Automatic | |
| Data rate | 400Kbps (for base level for 512Kbps broadband) 700Kbps (for 1Mbps broadband) File native or 3-4000Kbps for video upload (YouTube) |
Highest quality for video upload (YouTube) because files will be re-encoded, use native settings where possible. |
| ... additional optional settings | ||
| Crop border | For DV, 7 pixels left and right, 5 pixels top and bottom | |
| Audio codec settings | ||
| Compression | MP3 | |
| Sample rate | 44.1KHz | |
| Bit rate | 128Kbps (music) 64-128Kbps (speech) 320Kbps for video upload (YouTube) |
Highest quality for video upload (YouTube) because files will be re-encoded, use native settings where possible. |
| Channels | Stereo (music), Mono (speech) | |
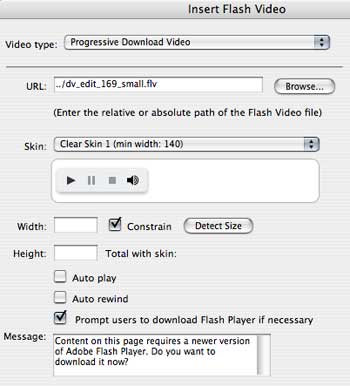
Dreamweaver's Insert Flash video dialogue box
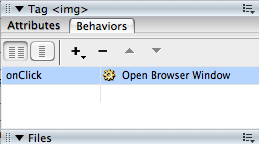
Adding a behaviour to open a new "video window"
3. Insert/"embed" the Flash Player Plug-in into a web page and link the .flv file to it
The process involves inserting/embedding the Flash video player plug-in code into the page and then linking to (or "Browsing" for) the .flv file which it will play.
- In Dreamweaver, open the html page you want the .flv file to appear in.
If you want your video to play in a new window which will open once a link is clicked, you can create a new html page for it. You may wish to add a simple "Close this window" JavaScript behaviour/link to allow the end-user to close the window again after they have watched the video. Like this.
- Place your cursor and insert the Flash Video (player plug-in) (Insert>Media>Flash video in Dreamweaver).
- In the Flash Player dialogue box that opens, choose (browse for) your .flv file.
- Click "Detect Size".
- Choose a player skin (playback controls).
- Set the playback options. If you have chosen to have the video play in a new window you may wish to tick "Auto play".
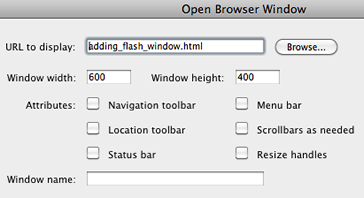
- If you have chosen to have the video play in a new window/page, you now need to open the html page from which the video window/page will be opened, and add a link that can be clicked to open the video window/page.
You will need to attach the "onClick" "Open browser window" behaviour to either some text or a thumbnail image from the video. You can prepare a thumbnail image in Photoshop from a selected still (screen grab?) from your video, perhaps with some text ("Click to play"?).

Use the Behaviour window to do attach the behaviour. Select your link text or thumbnail image and attach the behaviour by selecting it from the drop-down menu. Double click it and in the "Open browser window" dialogue box, browse for your video window/page and set a size that can accommodate both the "Close this window" link and the video. Add a # to the link box so when you roll over the thumbnail the cursor changes. - Save and preview/publish.