Creating and linking a CSS to an html doc
![]()
1. Create or open an XHTML compliant document.
Ensure it is formatted with the correct DOCTYPE and meta code. Dreamweaver will do this automatically.
 2. Format your HTML text
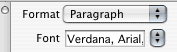
Add some text and format it using the Properties palette. Select your text in design view and make a selection (Paragraph, Heading 1 etc) from the Format menu. Depending on your Dreamweaver and browser preferences, it will be styled in variations of Arial or Times Roman at different weights and sizes. These are defaults and will be overruled by the CSS you are about to create.
WARNING: DO NOT USE THE FONT, SIZE OR COLOUR OPTIONS. These property/values will be defined in your style sheet.
3. Create a new style sheet document
Leave your html document open and follow these steps to create a new empty style sheet (css) ...
- Go to File>New and select Page type = CSS and then click "Create".
- A new empty style sheet document will appear. Save into your local site folder. It must be named in accordance with ISO naming conventions and end in the .css extension (eg "styles.css"). Check in your files window/palette that it has appeared and is correctly named.
- Close the sytle sheet. You can leave the style sheet open, if you want to edit it manually later, but its best to close it for now. Dreamweaver can create and edit styles in a style sheet that is NOT currently open! Cool!
4. Attach (link) the style sheet to your html document(s)
With your html document open and selected, link you style sheet to it. You will need to do this for every html page you want to style with the style sheet.
5. Add styles to the style sheet
- Create your first style. With the html doc you want to style open in design mode, open the CSS Styles Palette from the Window menu. Click the "New CSS Style" button at the bottom of the palette
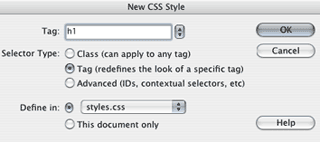
- In the dialogue box that opens, choose a tag to redefine in the Tag dialogue box at the top. In the image below, the h2 (heading 1) tag is selected, selector type = tag, and define in = styles.css (or whatever your style sheet is called). Click "OK".
- Choose property/values for your style using the dialogue box that opens. Basic styling suggestions are below.
6. Create additional styles in the style sheet you have created
You can create additional styles in the CSS file you have created. Click the New CSS Style button at the bottom of the CSS Styles palette. Define the style in your existing style sheet.
It's worth re-defining the property/values of the following tags ...
body (you could define an overall font family and page background color here)
p (Paragraph)
h2 (Heading 1)
h2 (Heading 2)
h3 (Heading 3)
h5 (Heading 4)
strong (bold ... this will give you flexibility if you want to easily change the styling of all bold type. Property/values options that work are "bold" and "normal")
em (italic ... this will give you flexibility if you want to easily change the styling of all italic type)
 7. Edit the existing styles
Later, when you have defined your styles you can edit them from the CSS Styles palette by selecting the style and then clicking the Edit Style ... button at the bottom (the pencil icon).
NOTE: Don't forget to stick to standard font families like Arial, Times or Verdana. All computers have these.
CSS - typographical styling examples
Click here for example html files and CSS stylesheets.
Click here for a page with some basic styling suggestions.