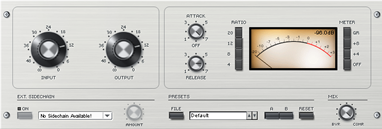
The Powercore plug-in emulation of the Urei 1176 compressor
- Signal / soundwave = the audio to be processed
- Transient = the beginning of a sound, its attack
- Dynamic range = the difference between the loudest and quietest parts of a signal, or the range of volumes a device or technology can accommodate
- Attenuation / Gain reduction = lowering the signal level
- Gain = signal level or a control to alter signal level
- Volume = signal level
- Loudness = the perceived volume (usually defined as the overall perceived volume of a signal/performance)
- Device/technology = in this context, a compression technology
Note: File compression and encoding (to reduce file size) is discussed here.
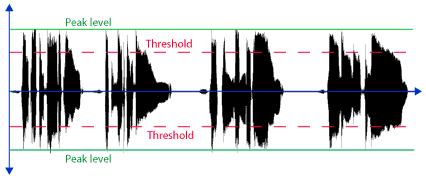
A lead vocal recording before compression (wide dynamic range)
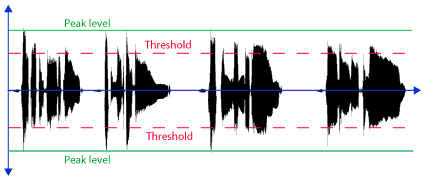
A lead vocal recording after compression has been applied at a ratio of 3:1
(peak reduction and reduced dynamic range
)
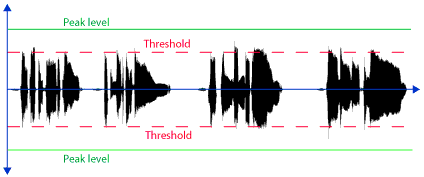
A lead vocal recording after compression and gain make-up (louder average volume)
What is compression and limiting?
Compression and limiting are processes which employ technology (both analogue and digital) to automatically change the dynamic range of a signal. In a nutshell, they are automatic volume controls.
They do this by changing (usually turning down) signal volume when it exceeds a preset level (threshold) thereby making the overall level more even. Because the process turns down, or attenuates, peaks in the signal, the overall level can then be raised (gain makeup) to maximise the dynamic range of the record or playback system.
Therefore, compression and limiting increases the average loudness of the signal by reducing its dynamic range.
But wait, there's more ...
Increasing dynamic range
Compression can also widen dynamic range if signal peaks are permitted to pass with a slow attack setting and quieter parts of the signal turned down even more. This is known as expansion.
Shaping the envelope of individual sounds
One effective and popular use of compression is to shape the envelope of individual drum hits. A snare drum, for example, can sound radically different with careful use of attack and release settings. In fact many popular snare sounds are impossible to achieve without compression.
Tonal changes
As well as controlling the dynamic "envelope" of the sound, compression can also be used to change tonality. Tonal changes to a signal passing through a compressor can occur partly because of the nature of the design and components and partly as a side effect of the compression process. It is not uncommon for sound engineers to pass a signal through a compressor with little or no gain reduction set, simply because the device introduces some pleasing tonal changes, perhaps as a result of harmonic distortion.
Limiting and clipping
Limiting is compression at its most extreme ratio settings (typically greater than 20:1). The limiting process prevents almost any signal from exceeding the threshold level.
Clipping is limiting at its most extreme and allows no signal beyond the threshold. This causes audible distortion that may go unnoticed if only occasional peaks are processed. A "brickwall" limiter will operate in extreme limiting and clipping territory.
When is compression used?
In "popular" music recording it is common to use compression during the following processes ...
- Recording and mixing bass
- Recording and mixing electric guitar
- Recording and mixing acoustic instruments
- Recording and mixing vocals
- Mixing drums and percussion
- Shaping the "tonal envelope" of a sound
- To add warmth and punch etc
- On the stereo mix to "glue" things together (mix-bus compression)
- Mastering
These are by no means the only uses.
Do I need to use compression?
If you regularly read the opinions of engineers, producers, musicians, journalists and other forum users, you would be forgiven for thinking that compression is an essential part of any recording project. This is absolutely not the case. If 10-15 years ago you asked any studio engineer, or read any authoritative source, they would not have emphasised the importance of compression. Most books devoted no more than a couple of pages to the subject. You might be interested to know that Bruce Swedien (mixed Off The Wall, Thriller, Bad, Give Me The Night etc) and Al Schmitt (just Google him!) both dislike and avoid compression. Compression is just another tool, and in the 24-bit world of wide dynamic range, no longer even an essential safety net for mic recording.
Side effects of compression
It is important to understand that very few, if any, compression technologies can reduce dynamic range without introducing audible side effects. These become more pronounced at more extreme settings. Whether these side effects are desirable or undesirable for a given job is for you to decide. Possible side effects include ...
- Pumping (unnatural and fast changes in loudness)
- Loss of transient detail
- An unnatural dynamic range (eg softly performed elements sound as loud as aggressively performed ones)
- Distortion (subtle effects are sometimes called "warmth" or "colouration")
- Tonal changes (as frequency balance differences are emphasised)
Creativity vs commerce - the loudness wars
Together with EQ and effects, compression is regarded by many, but not all, as one of the essential creative process of "non-classical" music production (classical music recording is preoccupied with recording as faithfully as possible a live performance, so any processing is frowned upon).
However, there are still some who regard compression and limiting as tools of the profit seeking recording and broadcast industries, so pre-occupied with ensuring their artists sound louder than their competitors. The trend towards over compression and limiting has led to many recordings which are both fatiguing to listen to and distorted. Read more here ... www.PleasurizeMusic.com/
Why compress and limit?
Although first conceived to solve technical problems inherent in recording and broadcast technologies, compressors and limiters are now widely regarded as both important technical and creative tools, and a multitude of models and technologies are employed by sound engineers not only to control dynamic range and "shape" the envelope of sounds but also to impart a pleasing distortion ("colour" or "warmth" etc).
The following are some of the primary applications ...
| Compression/limiting applications | Example applications |
|---|---|
| To prevent a signal with an unpredictable dynamic range from overloading a recording system | When recording a singer. |
| To reduce dynamic range in order to give a performance a more consistent overall volume. | When mixing a bass guitar part. |
| To change the dynamic envelope of short sounds. | To make a snare drum "fatter" or "snappier" |
| To change the tonality of a sound, to colour it. | To overdrive a valve compressor to add "warmth" to a vocal performance during mixing |
| To reduce dynamic range in order to safely maximise average volume during broadcast. | To limit all music broadcast from a radio station to ensure differing recordings all sound as loud as each other, and ensure each individual recording has more consistent loudness. |
| To help 'bind" a mix together. | Bus compression being used to process an entire mix. |
| To isolate and compress individual frequency ranges. | Multi-band compression isolating and compressing just the bass of a completed mix. |
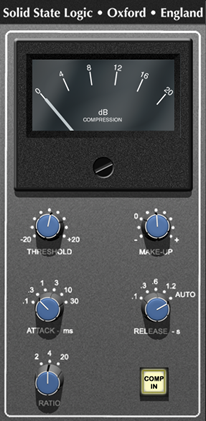
Typical compressor controls - the SSL
bus compressor
How do I operate a compressor?
Using compressors effectively requires theoretical knowledge and experience. The effect of compression on individual elements can be subtle to the untrained ear, but have a dramatic effect on the cohesiveness and effectiveness of a mix. Many experienced engineers may be embarrassed to admit that they use the same devices and settings again and again because experience has showed them they work. One famous mix engineer never alters the settings on his compressors. Amongst his collection he has multiples of the same model/device each with a different setup that he favours. If he discovers a new setting on an existing device, he buys a duplicate device for it!
With the best (expensive!) professional devices, it is harder to produce poor results and easier to emulate the sounds of past successful productions. I think it is true to say that along with microphones and mic pre-amps, attitudes towards the choice of compression technologies, and their settings, are among the most conservative in music production. This may reflect the fact that even professionals sometimes have trouble discerning the best devices and settings for a given performer, so they fall back on what they know has worked for them and other successful engineers in the past. Devices with minimal controls are particularly popular (eg The Teletronix LA2A).
Parameters & controls
Even though some of the most revered technologies have very few controls, every audio engineer needs to understand the following concepts.
Threshold
Compressors turn down the signal when it exceeds the threshold level. Control of this level is implemented in several differing designs ...
- Threshold control. This functions as you would expect. As you turn the threshold level down, compression occurs at lower and lower signal levels and the signal is compressed more often. Therefore the peak level, and overall perceived loudness, of the signal becomes quieter.
- Input gain control. With this arrangement there is a pre-fixed threshold level and you determine the amount of compression by altering the gain of the signal entering the compressor stage of the device. In this case the overall perceived level of the signal increases. For novices this can give the false impression that the sound is improving and its easy to apply inappropriate amounts of compression.
- Compression / Peak Reduction control. The simplest of controls compresses the signal more as you turn it up. It may simply be lowering the threshold level and applying pre-set ratio, attack and release settings, or employ a combination of threshold level, increasing ratio, and sometimes changing attack and release characteristics which change as the control is turned. Again, with this arrangement, the peak level, and overall perceived loudness, of the signal becomes quieter.
To achieve compression the signal must regularly drop below the threshold level and produce no gain reduction. If this does not happen, the compressors function will be closer to a simple volume control unless a pronounced soft knee setting is chosen.
![]()
Ratio
This is the ratio of gain reduction. Ratio is usually expressed thus ... "3:1". In this example any input signal which exceeds the threshold level will be turned down by two thirds. In other words, a signal which exceeds the threshold level by 3dB will be turned down by 2dB, and only 1dB of signal level above the threshold level will pass.
Some devices have a means to change the ratio manually, some have fixed ratio and some change the ratio automatically as you adjust the input gain or peak reduction control.
| Ratio | Effect |
|---|---|
| 1.5:1 | Gentle compression |
| 3:1 | Typical vocal compression |
| 6:1 | Strong compression |
| 12 to 20:1 | Aggressive compression |
| 18 - 20+:1 | Limiting |
| Infinity:1 | Clipping |
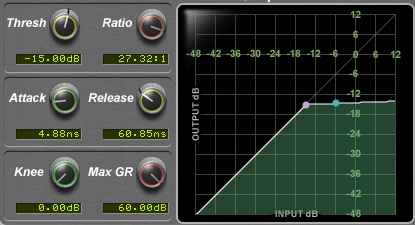
A soft knee compression response showing the gentle increase in ratio until
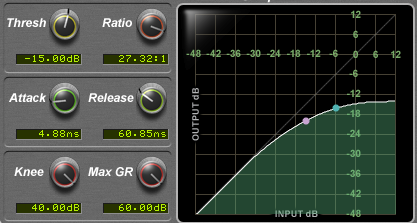
Hard knee compression response showing immediate change of ratio at the
threshold level
Knee characteristics (also known as slope)
This control determines how the compressor reacts as the signal approaches the threshold level.
A soft knee setting will gently increase the ratio as the signal approaches the threshold level until the ratio is reached usually at some point just beyond the threshold level. This produces a gentle curve (soft knee). This is the preferred setting when natural and transparent compression is required as it produces a less pronounced effect and less unwanted side effects.
A hard knee setting will produce a more aggressive and pronounced change in ratio as the signal reaches the threshold and is often preferred for sounds with faster attacks such as drums.
Some compressors have a hard/soft knee switch whilst others automatically change the knee characteristics as more compression is applied.
Attack
Set in milliseconds (ms) this sets how quickly the compressor will react once the threshold level has been exceeded. For very short sounds (eg a rimshot) a long attack time may prevent compression completely. A fast attack time will attenuate the transient. A medium time will allow the transient through and attenuate the decay or body of the sound, thus emphasising the transient.
Release
Set in milliseconds (ms) this sets how quickly compression will cease once the signal has fallen back below the threshold level. If you set this too long, you may find that the signal is always being compressed. If you compress a snare drum with a fast attack and release times, the transient will be reduced and the decay/body will be left unaltered, producing a less clicky and fatter/bigger snare.
A gain make-up
control

Gain makeup
Once the overall loudness of the signal has been reduced by the compression process, this control allows the overall volume of the signal to be turned back up to peak level (maximising dynamic range) before it leaves the device. Some devices without such a control may have an automatic make-up gain circuit.
Side chain
In order to determine when to apply gain reduction, a compressor must analyse or "look" at the signal. In most compressors this is achieved internally by taking a copy of the input signal (side chain) and using this to determine the action of the gain reduction circuitry. Some compressors allow an external signal to be used for this purpose so you could, for example, apply compression to a guitar part according to the signal from a bass drum, or perhaps feed the side chain signal through an EQ before it is analysed (so called frequency conscious compression).
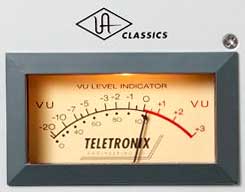
Metering
It is useful, and common, for a compressor to have a meter which can be switched between showing ...
- the input level - the meter moves up (LED) or left to right (VU) to show increasing signal level. Red will indicate distortion (analogue) or clipping (digital) of the gain reduction. circuitry.
- amount of gain reduction (GR) taking place - the meter moves down (LED) or right to left (VU) to show increasing compression. When no compression is taking place the meter will rest at 0dB. Green will indicate gain reduction and Red will indicate limiting and then clipping.
- overall output level - (the meter moves up (LED) or left to right (VU) to show increasing signal level. Red will indicate distortion (analogue) or clipping (digital) of output amplifier.
A PowerCore
plug-in
compressor
inserted in a
channel strip

Hook up
Unlike effects processors which may be shared between sounds via an auxiliary send/return setup, it is usual practice to route a single entire signal through a compressor.
Recording
During recording it is common to place the compressor inline between the pre-amplifier and recording device (commonly the A to D converter of an audio interface). This may involve using the insert send and return of a mixers channel strip, or by chaining a stand alone pre-amp and compressor together in line. A ratio of between 1.5:1 and 3:1 might be chosen with the threshold set high to catch peaks. Such as setup will protect the recording device from clipping and allow it's dynamic range to be exploited to the fullest.
Mixing
Compression is usually applied by using a channel (or bus/group) insert send/return loop to route the entire signal through the compressor.
Chaining
You may wish to apply more than one setting to deal with different dynamic range problems. This can be accomplished by chaining compressors together. For example you may wish to even out differences in volume between kick drum hits with a compressor set to attenuate just the hits which are too loud (high threshold, fast attack, slow release) and then shape the transients of all hits by applying a lower threshold, medium attack and fast release settings.
Splitting
If you find a single compression setting is unsuitable for every part of a performance, either automate setting changes, or duplicate the signal, insert a different compression on each signal and use mutes to switch between them.
Bus compression
You can compress an entire mix, or groups of sounds (stems) such as the rhythm section, brass section, backing vocals, guitars etc, by inserting a compressor into the master output or group buses. If you are going to have your mixes professionally mastered, you should avoid these processes and leave them to the mastering engineer.
Parallel compression
Compress a duplicate of a signal (perhaps with an axillary send channel) then mix and balance the compressed and uncompressed versions together.
Suggested applications and settings
The best way to use any compressor is to experiment with it. There are absolutely no rules for achieving creatively pleasing results. However, the following are some tried and tested applications and methodologies which may serve as some sort of starting point. NOTE: It is almost impossible to recommend exact settings because every situation, performance and signal differs.
| Application | Notes | Threshold | Knee | Ratio | Attack | Release |
|---|---|---|---|---|---|---|
| Bus compression for mixes | Mix from the outset with the compressor inserted on your master stereo bus output. Setting up effective bus compression can be challenging because signals containing combinations of sounds/frequencies are more likely to produce unwanted side effects. Start by experimenting with a gentle compression ratio and set the threshold to catch peaks only. 1-3dB of gain reduction with moderate attack and release times will allow you to increase the overall loudness of your mixes without producing pumping or unwanted distortion. Experiment with release settings. | For peaks only | Soft | 1.5:1 to 2:1 | Med | Med |
| Increasing the click (transient) of a kick or snare | Let the transient pass and attenuate the decay/body. | Med | Hard | 8:1 | Med | Med |
| Decreasing the click (transient) of a kick or snare to create a fatter sound | Attenuate the transient but let the decay/body pass. NOTE: This method can reduce punch by attenuating bass frequencies which may mostly reside in the transient. | Med | Hard | 8:1 | Very fast | Fast |
| Making a kick performance consistent (for dance music) | Set a threshold which catches any hit which is too loud and the attack and release to turn down the entire hit. | Med | Hard | 5:1 | Very fast | Slow |
| Mix balancing. Transparent gain reduction to improve average loudness consistency (vocals, guitars etc) | Attenuate any peaks and use gain make-up to raise the average loudness. | For peaks only | Soft | 3:1 | Fast | Med |
| Compressing basses | Basses often have wildly varying dynamic ranges in the lower frequencies. Don't be afraid to experiment with settings that add warmth and distortion. | Med | Soft | 6:1 | Med | Slow |
| Toms | To tighten and make more punchy | Med | Soft | 5:1 | Fast | Med |
| Acoustic guitars | Tighten dynamic range | Peaks only | Soft | 3:1 | Fast | Slow |
| Drum overheads | Tighten dynamic range, soften transients | Peaks only | Soft | 2:1 | Fast | Med |
A snare drum hit before compression (wide
dynamic range)
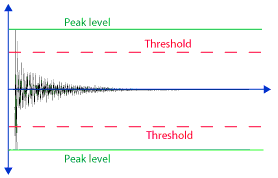
A snare drum hit after compression has been applied
at a ratio of 10:1, fast attack and release (peak
reduction and reduced dynamic range
)
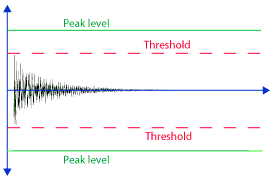
A snare drum hit after compression and gain make-up
(louder average volume and a "fatter" sound)
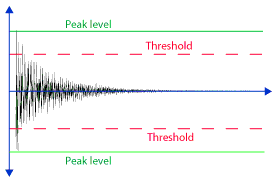
Example scenarios
1. Vocal mixing
Consider a lead vocal performance. It is common for a performance to contain wide variations in volume (wide dynamic range). Sometimes these are intended, such as when a singer must use power to reach a high note, sometimes not, such as when a singer loses power/volume towards the end of a long phrase. Backing instrumentation is less likely to exhibit these variations in volume, so during mixing it is possible that the vocal will sometimes overpower the backing whilst at other times become in-distinct. The answer is to "ride" the volume during mixing either by altering the level with fader movements and/or by employing a compressor to create a more even overall loudness (reduce the dynamic range). In practice it is common for both these techniques to be employed. Many engineers employ compression to reduce dynamic range and then use fader movements to raise the overall level during louder passages such as choruses and lower it for verses.
2. Drum shaping
Many sounds have changing frequency content over time and compression can alter this. Compression can have a dramatic effect on the tonal qualities of drum hits, as well as controlling the overall loudness of a performance. By altering attack and release settings it is possible to transform the sound of a snare drum by altering the volume relationships between the transient (attack) and decay parts of the sound. Some kick drums have greater low frequency in the transient, so a fast attack may reduce its punch. It is well worth experimenting to gain an understanding of what is possible. (See Suggested Settings later).
3. Multi-band compression
Mastering engineers often find that the finished stereo mixes they receive need correcting. One of the tools they can employ is a multi-band compressor. These devices use a filter to isolate a part of the frequency range (eg bass between 20Hz and 200Hz) which can then be compressed without altering the mid range and treble.
4. Mix bus compression
A compressor is inserted into the main stereo out before mixing begins. This is critical because correct decisions about individual track level and eq settings can only be accurate this way. Inserting a compressor after the mix is complete may alter the tonality and dynamics of the track in an unpredictable way.
The compressor is set to achieve an average 1-3dB of gain reduction on peaks, ratio between 1.5:1 and 2.5:1, attack approx 50ms and release on 250ms or auto settings. The attack and release setting will depend on the music. Tempo will dictate release settings. For up tempo music the timing of the release will need to match the tempo to ensure the compressor releases between each bass drum or snare hit. If the release is set too fast, aggressive "pumping" may occur, but set too slow and the compressor will not reset between transients and the entire mix will sound constricted. A fast attack and medium release will reduce transients and raise the sustain level of musical events leading to a reduction in dynamic range, but because so much tonal information is present in the transient the tonality of the mix can be dulled if care is not taken.
A good indicator is the ballistics of the gain reduction meters. If they are bouncing in time with the groove of the music, you're basic settings are good. Adjust the release setting until they do. If they are bouncing too fast, the compressor is trying to return to unity gain too quickly.
The genesis of mix bus compression has an economic imperative. If the music sounded louder than others on the radio, then a song would attract more attention from the audience and advertisers when played out before or after one without.
We have come to associate the sound of both transparent and coloured mix bus compression with a "professional" and "successful" sound because so of many of those historic records (take a bow Geoff Emerick) made a lot of money.
Once you start considering that maybe big business is pulling our creative strings, you can take a different stance and consider whether mix bus compression is actually adding anything of artistic merit to your recordings. Maybe it is, maybe it isn't.
There is no such thing as a "good" sound. Appreciation is purely subjective. There is however, such a thing as an economically successfully sound, and whether or not that makes music good .. well, who knows!
Parallel compression
This is a process in which the signal is duplicated, compression is applied to one of the signals only and then they are mixed back together again. This can make the perceived average loudness of the sound more consistent and punchier, and the tone "warmer"without spoiling the transients or sacrificing clarity and air.
One use of parallel compression is to raise the level of low level signals without altering loud ones. The signals below the threshold level will sum with the uncompressed copy and produce a 6dB increase whilst those above the threshold level will be reduced producing little or no increase when they sum.
A version of parallel compression favoured by Nashville studios is "invisible compression". Instead of being duplicated, a copy of the signal is sent down an auxiliary bus to the compressor which is treated like an effect processor (send and return).
Parallel compression does not always work with digital processors where processor latency can produce unwanted phase effects.
Teletronix LA2A, a classic analogue hardware electro-optical valve
compressor

UA/Urei 1176, a classic transistor/FET compressor/limiter

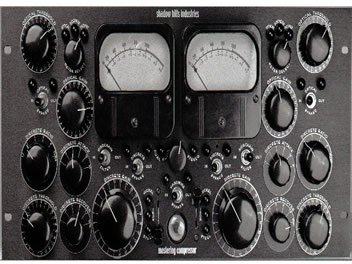
Shadow Hills mastering compressor
Focusrite Liquid Channel employs software convolution to emulate
classic mic pre-amp and compressor combinations

Universal Audio PCI DSP plug-ins card

TC Electronic PowerCore Firewire DSP device

Popular compressor choices
It's worth reminding ourselves that the following suggestions are simply subjective opinion and that you mind find that you don't agree with any of these choices. There are a wide range of devices available (especially for the API 500 series rack) often by companies you will never have heard of before. Because evaluating and comparing compressors before purchase can be challenging, many will simply use what they have heard was used on successful records they like. But you don't have to like the sound of an 1176 on drums! Sometimes it takes months or years to figure out a good application for a device.
| Application | Device |
|---|---|
| Drums | UA / Urei 1176 DBX 160 series SSL mix bus compressor Empirical Labs Distressor Gem Audio Labs Preceptor |
| Bass | UA / Teletronix LA2A UA / Urei 1176 Joemeek SC2 |
| Vocals | UA / Teletronix LA2A Fairchild 660 & 670 Avalon VT737SP Tube Tech CL1B Gates Sta-Level Neve 2264A |
| Mix bus | Focusrite Red 3 Gem Audio Labs Preceptor SSL mix bus compressor Shadow Hills Mastering Compressor TK Audio BC1 Neve 33609JD API 2500 |
Technologies/devices
Most compressor/limiter technologies fall into 1 of 3 categories ...
- Technologies that can compress a signal (compressors)
- Technologies that can limit a signal (limiters)
- Technologies that can compress and/or limit a signal (compressors/limiters)
These technologies can take several forms ...
- Analogue hardware outboard devices such as the Teletronix LA2A electro-optical compressor and Dbx-160 VCA compressor
- Analogue hardware channel strip devices such as the Focusrite ISA 430
- Analogue and digital guitar pedals
- Software plug-ins/emulations in hardware devices such as digital mixing desks
- Software plug-ins/emulations in outboard hardware devices such as the Focusrite Liquid Channel
- Software plug-ins/emulations in audio interfaces (to help control levels when recording)
- Software plug-ins/emulations in DAWs (such as Pro Tools, Logic and Cubase)
- Software plug-ins/emulations in FireWire and PCI DSP processors (such as the UAD PC1e cards or TC Electronics PowerCore devices)
The precise design of compression technologies is critical to its ability to produce a musically pleasing result. If you wish to emulate the sounds of many mainstream commercial "professional" recordings, you may need to use professional (expensive!) compressor technologies.
Affordable devices
Unlike effect processors and synthesisers (for example), for some reason there are few, if any, affordable compressors capable of achieving good results with ease, and many which can make things worse. At best it may be challenging to get the results you want, at worst it will be impossible.
Circuit designs
We have already discussed the side chain signal path but the particular electronic design and combination of the signal sensing circuitry, gain reduction amplifier, and all the other components of the input and output circuitry, including input and output transformers, is what gives a compressor its individual character and tonality. As ever, you should read what the experts have to say and then audition, experiment and decide for yourself.
Gain reduction circuits
There is no one design that is considered superior. Most compressors use one of 4 methods ...
| Gain reduction method | Comments | Pros | Cons | Example device(s) |
|---|---|---|---|---|
| VCA | Uses a control voltage (effectively a copy of the input signal) to control gain reduction. | Musical and colourful sound. Method used by many classic models. Popular for mix bus compression. | None | Focusrite Red 3, SSL bus compressor, DBX 160, Gem Audio Labs Preceptor |
| Optical | Uses an electro-optical cell in the side chain to control the gain reduction amplifier. | Simple circuit = transparency. Often referred to as musical. Popular for vocals | Not the fastest at responding to transients. | UA/Teletronix LA2A, Tube Tec CL18, Avalon VT737SP |
| FTET | Uses a transistor to control the gain amplifier. | Precise. Fastest attack times. Good method for limiters. Popular for drums. | Can sound harsh and bright at greater ratios | Urei / Universal audio 1176 |
| Tube / valve | Tube re-biasing controls gain reduction. | Tube sound = pleasing harmonic distortion characteristics. Warm. | Too characterful for transparent compression. Not precise or transparent. | Fairchild 660, Analogue Tube AT101, Manley Vari-mu, Gates Sta-Level |
Classic compressors
Some classic compressor models have achieved legendary status and are widely thought to be essential for producing that "professional sound". This maybe the result of a mix of good engineering and good marketing on the part of manufacturers, but there is no doubt that a well designed model will make it easier to achieve effective transparent control of dynamic range, and impart a pleasing colouration (distortion) to the sound. Cheaper models often produce less pleasing distortion and require skill and effort to use effectively.
Here are some classics and some of the applications they have become well know for ...
| Device | Popular applications |
|---|---|
| Empirical labs Distressor | Widely used to apply large amounts of compression to drums in order to change their tonal qualities. Vocals, when extra character and enhancement is required. This device emulates a number of classic valve compressors and has extensive side chain options. |
| API 2500 | Mix bus compression, drum sub-mixes |
| SSL bus compressor | Entire mixes (mix bus compression) but also sounds great on bass and electric guitar, and snare drums. |
| Urei 1176 | Adds sparkle and excitement to vocals. Helps basses cut through a mix. Favoured by many for drums. |
| Fairchild 670 | Favoured for the tonal enhancement qualities it imparts to vocals (lots of valves!) as much as for its gain reduction circuitry. Imparts presence. |
| Teletronix LA2A | Warm musical vocal compression. Also great on guitars and bass. |
| Dbx-160 series | Clean transparent vocal compression. Much favoured for drums, great for transient tweaking. |
| Summit TLA100A | Musical vocal compression that retains the high end |
| Neve 33609 | Effective bus compressor offers smooth and transparent gain reduction. Also works well on guitars and almost everything else too. |
| Avalon VT737SP | Great for lead vocals. Smooth transparent warm compression. |
| Focusrite Red 3 | Fat and warm vocal compression. Mix bus compression. |
This is by no means a comprehensive list and remember, every compressor has its advocates and its detractors. And it's worth noting that even amongst the most successful professionals there is plenty of disagreement about which compressors are best for which jobs.
In conclusion
In researching this article I experimented with my own compressors, talked to engineers and referred to reference material from the last 15 years. I was surprised to find that 1990s editions of authoritative and comprehensive books on sound recording practice, gave up no more than one or two pages to the subject, and covered only the basic technical concepts. This I think was not the fault of those authors but a reflection of how compression has come to be regarded as an important creative tool over the last decade. Some of us were aware of Joe Meek's and Geoff Emerick's ground-breaking work in the 1960s, but it seems that only recently, perhaps because of the popularity of the project studio, that creative compression techniques have been widely embraced by mainstream music makers.
Nevertheless, it is not always desirable or necessary to use compression. It's perfectly possible to create wonderful, transparent and dynamic recordings without it. Who knows, no compression might be the fashion in a few years time.

