If you are using vocals they will almost certainly be the most important element of your recording. Capturing a great performance is both a technical and psychological challenge. No other part of the recording process is as challenging but with a little care excellent results are attainable even from modest equipment setups. (For the purposes of this article we will ignore spoken word and live recording and concentrate on recording a singer in the studio).
For those of you wanting to record vocal "sound bites" to be sampled, processed and used in dance tracks, the same advice applies.
The good news is that over the last 5 years or so most of the "quality" equipment monopolies, held by esteemed manufactures such as Focusrite and Neumann, have been broken by the introduction of a vast range of affordable high quality microphones, pre-amps, A to D converters/audio interfaces and of course cheap DAW based digital recording systems. The bad news is that you can no longer blame equipment for poor sounding recordings!
Preparation
Organise your recording day around your performer. At what time are they likely to be at their best? Many singers won't perform in the mornings but don't think this means you can keep them hanging around for hours whilst you perfect your Steve Vai solo.
Be prepared to record the moment they arrive and leave yourself plenty of time. This means setting up essential equipment and testing it. Check that the headphones and microphone paths are working correctly and remedy any failings before your performer arrives.
Ensure the temperature in the recording room/area is average, not too hot and not too cold. Ask your performer if they are comfortable and have everything they need.
Don't smoke before or during the session.
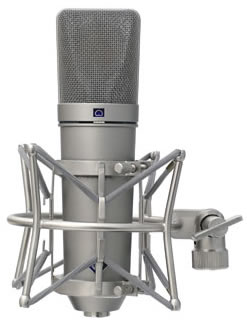
Neumann U87 (left) - a studio standard condenser mic, and the
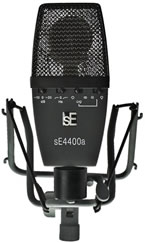
sE Electronics 4400a - an excellent affordable Chinese made mic
Equipment
Here's a suggested list ...
- Music stand - unless your performer has memorised their words, they will have them printed out or written down. You need to ensure they are supported so the performer can see them and your recordings aren't spoilt by the sound of rustling paper.
- Boom microphone stand - so that the performer doesn't come into contact with the stand legs.
- Shock mount - not essential but it will be one less thing to worry about.
- Pop shield - essential. These are cheap to buy so its no longer necessary to create an inferior one out of a wire coat hanger and pair of stockings.
- Good quality XLR microphone lead - if your microphone connects via a jack lead it is almost certainly not suitable for achieving professional results.
- Microphone - try whatever you've got, but you will probably need at least one large diaphragm condenser/capacitor or back-electret model. (more on this later).
- Good quality closed back headphones.
- Acoustic treatment - if you are recording in an untreated space you will want just the direct sound from the singer, so try to eradicate room reflections as much as possible (more on this later).
- Drinks - whatever your performer prefers.
Microphones
If you have a range of microphones, set them all up and compare the results before resorting to EQ to cure problems. Although your best studio condenser or ribbon microphone will probably work well with its flattering sound, wide frequency response, and high sensitivity, allowing it to capture the fine details of a performance, a humble dynamic model may suit some voices better particularly when the voice is powerful or sibilance is a problem. Because every singer differs in tone and power there are no absolute rules about what microphone you should use. You and your singer should decide what's best.
There are a wide range of esoteric, affordable and budget microphones available and many of the recent spate of affordable condenser microphones for the home or project studio are capable of results better than or comparable to established professional brands.
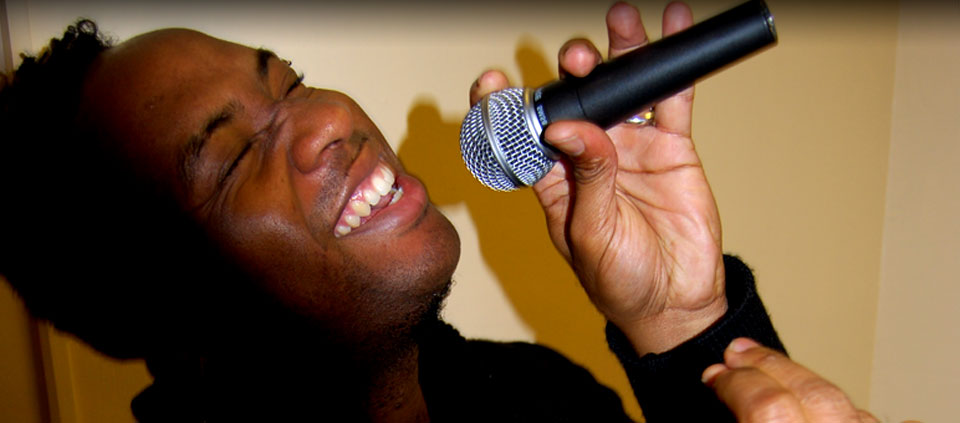
If your singer cannot perform with headphones you can try a dynamic microphone (Shure SM58?) in the control room. Reverse the phase of one of your monitors so any spill is cancelled and position your performer centrally between them and towards the back of the room. A screen in front of the microphone and an absorber behind your performer will help.
The Focusrite ISA 430 - a high quality stand-alone channel strip
featuring pre-amp, eq, compression and A to D

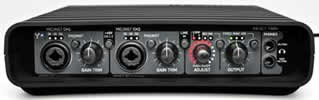
TC Electronics Impact Twin - a Firewire audio interface with
built-in pre-amps, compressors and monitoring reverb
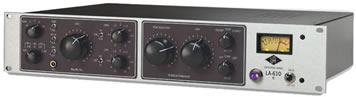
The Universal Audio 610 - a valve based channel strip incorporating
pre-amp, shelving eq, T4 optical compressor and limiting
Microphone pre-amps
There are 3 primary choices ...
- Mixer input channel pre-amps - Quality is entirely dependent on design and cost. Many established brands have excellent microphone pre-amps but you should be cautious of cheaper models.
- Stand alone microphone pre-amp/channel strips - the popularity of the DAW and project studios where often only one performance is recorded at a time, has led to manufactures producing high quality channel strips combining microphone pre-amp, DI input, line input, EQ and compressor through which a microphone can be routed before entering the A to D converter of an audio interface. Many of these devices have built-in A to D to facilitate direct connection to a DAW.
- Microphone pre-amps built into audio interfaces - There are now many manufactures building good quality (or so they claim!) microphone pre-amps into their interfaces. You will need to ensure that 24-bit encoding is supported, connection is via XLR, and that phantom power and facilities for latency free monitoring are available. A built-in compressor and monitoring reverb are useful additions.
Solid state or valve?
Both microphones and microphone pre-amps are available featuring a variety of electronic designs. Valve technologies "colour" the sound by introducing additional harmonics ("warmth") and can create a bigger and more pleasing result. A performer with a "thin" timbre to their voice may benefit but it might prove unwise to have valve technology as your only option.
If you are very lucky you will have solid state and valve pre-amps and microphones to try out but if you are on a budget you may be better off buying solid state to start off with. In general, a well designed solid state device will have a flatter frequency response and produce a more accurate and transparent sound, perhaps at the expense of "character".
Pop shields and handling
Use a pop shield. Home made ones will never be as effective as professional models but are better than nothing. If popping (vocal "plosives" caused by B's and P's) is a problem, have your singer sing slightly over or under the microphone but remember off-axis the sound may become duller. Mount the microphone on a boom stand, preferably in a suspension mount, to eliminate handling noise.
Sibilance (a high frequency whistling which accompanies S's and T's and which can be accentuated by studio microphones) is a problem that many engineers struggle to eliminate. During mixing the recording can be processed with a so-called De-essers (actually a type of compressor designed to attenuate sibilant frequencies).
I have always found that prevention is better than cure and endeavour to eliminate popping and sibilance with microphone positioning techniques and pop shields, but if all techniques fail you will have no choice but to use a de-esser. Use it in the mix, not during recording.
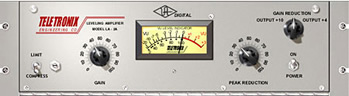
The Teletronix LA2A - a popular vocal compressor
Processing
Most cautious engineers (including me!) prefer to record flat and dry and add dynamic processing, eq and fx in the mix. However, you may wish to record with a little soft knee compression. Compression is necessary to restrict the wide dynamic range many singers exhibit and squeeze their performance onto a recording medium like tape. With the advent of 24-bit digital recording with its wider dynamic range, many engineers prefer to record without compression, leaving additional headroom in the record level to allow for peaks.
If you do use compression, a ratio setting of between 2:1 and 5:1, and a threshold setting allowing for about 6-14db of gain reduction during peaks usually sounds transparent and allows for a higher record level. If your compressor has an auto feature use it to help control the attack and release/decay characteristics otherwise set these controls to around 2-12 ms. Do not over-compress or Limit the vocal during recording unless you want to achieve an intentionally unnatural effect. NOTE: These are suggested settings and you should always use your ears and experiment.
Because of changing vocal dynamics over the course of a session (noise) gating the vocal to tape/disk is not usually considered a good idea. If you have problems with noise or spill, track them down and eliminate them at source or use your DAW to fix them later.
Use EQ and FX only on the monitor signal where you have a non-destructive opportunity to make as many mistakes as you like in the mix. You may find it necessary to eq the microphone output before recording but remember, if you are using a good vocal microphone, greater minds than yours and mine designed it that way for a reason. There is however nothing wrong with using a hi-pass filter to remove very low frequency rumble below 50Hz.
Put some reverb on the monitor signal. Singers love Lexicons but whatever you use make it natural sounding and ask their opinion.
Stand-alone channel strips
There are an increasing number of stand alone "voice processors" or "channel strips" available (images above). They will let you bypass a mixer and go straight to disc/tape. These bring together several processing components into one box, typically microphone pre-amp, eq and compressor. In general they are an excellent idea, especially for project studios without high quality recording consoles. Use their processing features sparingly during recording, it's easy to spoil the sound of a good microphone.
The studio standard Beyer DT100 - valued
for their robustness
rather than audio quality
Foldback & headphones
It has long been common studio practice to create a separate mix for the foldback on one (or two for stereo monitoring) mixer/DAW Auxiliaries. This is a perfectly good technique if your monitor mix for the performer needs to be radically different from your "mix in progress". However, if you send your "mix in progress" via the mixer/DAW Master outs direct to a headphone amp (or mixer or audio interface headphone socket), both you and the singer will be hearing the rough mix in progress with fx in place. A more complete sounding backing track may inspire a better performance. Remember to push the monitor level of the vocal you are recording significantly higher than it will be in the mix to attain a reasonable level in the headphones for your singer.
Using good headphones will help your singer attain an acceptable aural perspective. This is crucial. Singing into a microphone and hearing your voice coming back from outside of your head is a far from ideal way to record but for obvious reasons we're stuck with it. Although a studio standard, Beyer DT100s are not ideal for vocals. They are designed for durability rather than sound quality. If you are on a budget try using a pair of hi-fi headphones. They must of course be a closed back design to prevent spill getting into the microphone. I use Sennheiser HD250's and they relay the kind of detail needed.
Test the headphone mix and level to ensure you are not getting too much foldback spill from the microphone.
Positioning & acoustics
Controlled room ambience is a wonderful thing but you only have one chance to get it right. Unless you are intimately acquainted with the reverberation characteristics of the room you are recording in and are sure of your vocal mix strategy I would recommend selecting a microphone with a cardioid response allowing you to record primarily direct sound. In theory an omni directional response will give you a more natural sound, if this is what you want, but you will need to record in an acoustically dead environment such as a vocal booth.
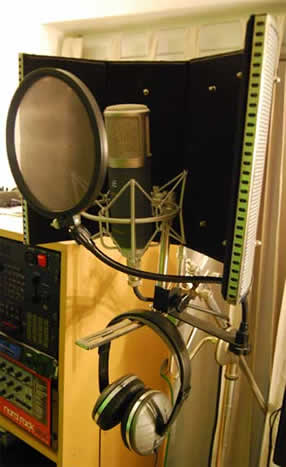
You will need to stop room reflections entering the microphone by damping high frequency echoes behind the microphone and performer. You could hang duvets or perhaps use acoustic devices such as the popular SE Electronic Refexion filter (pictured above). More on room acoustics is here.
You usually need a gap of between 6-10 inches between your performer and the microphone. The best way to achieve this is to place a pop shield about 4-8 inches away from the microphone and tell your performer to get as close as they like without touching it. If you need to position the microphone off-axis the pop shield will act as a visual focus for them and ensure that they do not wander more than 30 degrees off-axis where the sound will change.
Place a music stand with the lyric sheet on it at eye level and if possible in such a way that your singer does not have to turn their head to read it. In general performance sung from memory are better than those read but unless your singer has written the lyrics themselves this may not be possible.
Recording
Be patient
So the singer has arrived, the kettle activated, and loose jangley metal objects removed from their person. A word of warning. A singers range can expand dramatically as they warm up so get them on the microphone running through the song. It is intensely irritating to be continuously interrupted when warming up so let them sing through the song three or four times while you make the coffee (what do you mean your sequencer doesn't have cycle mode!). Don't worry if the performance sounds awful to begin with, it nearly always does.
Finding the right key
If you have not done so already and are using sequenced backing you need to find the right key. A change of 1 semitone +/- can have a dramatic effect on the overall feel of the vocal. In general your singer will have more problems pitching if the key is too low. Inevitably changing the key will present problems for other musicians but it's a question of priorities.
Checking levels
Solo the vocal and check you are getting little or no headphone spill. Continually check the tape/DAW record level until they are fully warmed up. When setting the record level be conservative. Ensure that the microphone pre-amp is not being overloaded, then the microphone itself, and use a pad switch to attenuate the level if necessary. Distortion is horrible and often goes unnoticed until it's too late. If you are using a digital recorder err on the sound of caution, once those 24-bits are used up you've had it. Make sure your peak signal rises no higher than -2dB.
Avoid misunderstandings
Be sure you are both using the same terminology. Rise or Bridge?, Doubling or Tracking?. Don't overburden your performer with comments. Discuss and solve one problem at a time. At all times you must express enthusiasm and voice encouragement even if things look bleak. Performer need to feel good to perform at their best. Another problem is knowing exactly what their best is. Of course you will want to push them as far as you can but decide exactly what is too far as soon as possible.
Decide whether to record lead or backing vocals first. Starting with backing may allow them to warm up but could also exhaust them prematurely.
Allow your performer plenty of time and freedom to get it right. Don't pressure them. Seek their opinion and play back the takes when asked. Invite them into the control room for playback every 20 minutes or so. Monitor at moderate to low levels so you don't tire your ears and miss mistakes.
When dropping in, monitor the performer live prior to the drop in point so they are not coming in cold. Give them just enough lead in time, not too little and not too much. Use the programmable Drop-In/Out and Pre-roll features of your recorder for consistency. It will help you to place a strip of masking tape near the transport controls and write down the tape counter locations for all parts of the song if you are using a tape recorder. DAW users should create named markers in the timeline.
When multitracking backing vocals, pan completed takes away from centre and lower them in the mix.
Compiling a lead vocal
You may want to compile a finished lead vocal from a number of separate performances or try to record one complete track by dropping in and out. Record the less stressful parts first. You may find it useful to start with all the verses followed by the bridges and so on. Don't over tire your singer with belting chorus lines and ad-lib's early on in the session. They will perform these better when fully warmed up later on.
If you decide to compile a finished vocal and are not using a DAW (you have my sympathy, I've been there many times!) bypass the mixer if possible and bounce directly between recorder tracks.
Recording a backing vocal ensemble
Having singers performing close harmony parts simultaneously can work well if they are professional and experienced at controlling and creating an effective balance. The performance will almost certainly be better than tracking the parts individually and it can make for a much more enjoyable experience for all.
If you have just 2 singers you can choose a microphone with a figure of 8 polar pattern and place the singers opposite each other. With more singers you could use an omni directional polar pattern and place them around the microphone. You will need to experiment with individual distances to get the right balance between the voices. Ideally you will have an acoustically treated room and experiment with an overhead stereo pair to capture the natural performance of the singers, but this is not always possible and does not always produce the best result.
If you have to resort to individual tracking, perhaps because you want to control the balance of harmony parts in the mix, remember to pan completed takes away from centre and lower them in volume as you overdub.
Trouble-shooting
| Question | Answer |
|---|---|
| What if the singer sings continually flat or sharp? | Tell them. Check the backing instrumentation is well tuned. Check the monitor vocal balance. Check that you have a musical sound sufficiently high in the mix for the singer to pitch too. Suggest they place one earphone half on/half off. Pitch/Speed adjust your recorder without telling them. If all else fail forget the headphones and record live in the control room facing towards but as far from the monitors as possible. Reverse the phase of one of your speakers and switch your mixer or amps monitor output to mono. Freddie Mercury recorded like this with a Shure SM58 and so can you with a little care. |
| What if the singer sings continually out of time? | Tell them. Raise the level of the drum kit and percussion but remember to re-check headphone spill. |
| What if the recording level jumps erratically? | Ask your singer not to move around the microphone and pull back only slightly for loud passages. Adjust your compressor so it compresses a little all the time. |
Mixing
Take care not to undo all your good work in the mix. Be aware of the dangers of over eq-ing the voice to make it cut through. You may find that automating level changes is better than using compression. You might consider leaving the vocal as natural sounding as possible and fitting everything else around it. If recorded well it will act as a guide for the entire eq and gain structure of your mix.
You can leave your lead vocal completely dry, or with just a little delay (don't forget to cut hi-freq from the delay). Reverb is not always necessary although backing vocals will probably need it to place them in the mix.
Pan backing vocals and instrumentation away from centre to leave space for the lead vocal and lead instrument when it takes over in the solo. Well arranged instrumentation will make it easier for you to place the vocal in the mix.
If your lead vocal performance is not as good as you hoped it might be, don't bury it in the mix. Try making it louder than normal, it may sound more convincing. In general a vocal mixed too high is better than one which is low and indistinct.
Refer to your favourite CD's often and monitor at low levels to establish the correct balance. Try out a rough mix in the car or on your personal stereo and as many other systems as you can.
In Conclusion
To sing well under studio conditions is without doubt the hardest task of all and so we must be sensitive to every detail of the process. Always remember, you may have the finest song, arrangement and instrumentation money can buy but without an excellent vocal no-one's going to notice or care.