Layout with <div> tags
![]()
Associated articles
In order to understand this page, it will help you to read our associated article on ...
- Seperating content from styling (or formatting)
- CSS - layout & positioning concepts
- CSS - layout & positioning WITHOUT layers
- CSS - layout & positioning WITH layers
Example HTML and CSS
Click here for our examples of layout and positioning with <div> tags and layers. They will help you understand the Dreamweaver tutorial on this page.
Click here for a page with some basic styling suggestions.
Creating <div> tags in Dreamweaver
The following explains how to use the <div> tag, ID selectors and layers to create layout elements which can be defined by styles in an external CSS.
1. Insert a <div> tag
Lets assume you have an XHTML compliant HTML document (tick the "Make document XHTML compliant" in the New Document dialogue box), and you want to create a layout element (box) to position your content (you are going to add the content to the box later).
Place your cursor on the blank page. It should be within the empty <body> <div id="fb-root"></div> <script>(function(d, s, id) { var js, fjs = d.getElementsByTagName(s)[0]; if (d.getElementById(id)) return; js = d.createElement(s); js.id = id; js.src = "//connect.facebook.net/en_US/all.js#xfbml=1"; fjs.parentNode.insertBefore(js, fjs); }(document, 'script', 'facebook-jssdk'));</script> tags (switch to code view to check).
IMPORTANT NOTE: You are going to insert a <div> tag at this location with a unique ID and later add your content inside it. The <div> and its content will be positioned within the HTML flow at this position but you will be able to make it appear where ever you want on the page with a CSS style. This is an important distinction because the location of the <div> tag will define the order the text will be read by a screen reader.
There are 2 methods for inserting <div> tags. Method 2 takes a little longer but is more exact.
Method 1
Click the Insert div tag button on the Insert>Layout palette.
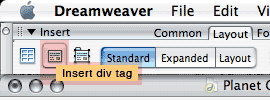
In the dialogue box that opens enter a unique ID name and click OK.
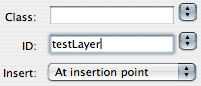
A <div> tag will be inserted with some temporary placeholder text. Switch to code view and take a look.
![]()
Method 2
Switch to code view and type the whole tag in manually. In many ways this is a better method once you have created several <div> tags, because you can determine the exact order of the <div> tags within the <body> <div id="fb-root"></div> <script>(function(d, s, id) { var js, fjs = d.getElementsByTagName(s)[0]; if (d.getElementById(id)) return; js = d.createElement(s); js.id = id; js.src = "//connect.facebook.net/en_US/all.js#xfbml=1"; fjs.parentNode.insertBefore(js, fjs); }(document, 'script', 'facebook-jssdk'));</script> tag.
You will have to use this method when nesting <div> tags inside other <div> tags, like this ...
<div id="outerbox">
<div id="innerbox">Content for id "innerbox" goes here</div>
</div>
2. Create a CSS
If you don't know how, advice is given here.
3. Create a style to define a visible box
Open the CSS Styles Palette. Click the "New CSS Style" button at the bottom of the palette

Click the Advanced radio button and type a hash # (alt-3 on a Mac) followed by your ID name into the Selector: box.
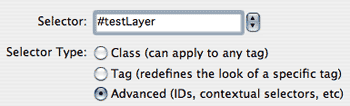
WARNING: Ensure you are defining the new style in your existing style sheet and not just the current document.
Click OK and then set values for background colour and width and height property/values. Click apply to see the style take effect.
If you don't want to turn your <div> into a layer click done now. Otherwise ...
Turn the <div> tag into a layer
A Layer is a <div> tag with positioning property/values.
4. Set positioning property/values
Click the Positioning option in the CSS Style Definition dialogue box which opens. Type should be set to Absolute or relative as required. Then define the position and z-index of your layer and click OK.
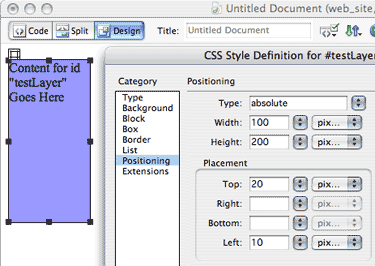
In this example I have given the layer a blue background colour so that it is clearly visible.
Position your cursor inside the layer box and insert text, images, rollovers, Flash or anything else as usual.
5. Other layers stuff
Z-index Try experimenting with 2 overlapping layers and Z-index. Try putting gifs with transparent backgrounds into layers without backgrounds and placing them over each other.
Scrolling text with Overflow If you place too much text inside a layer you can have scroll bars appear automatically.
Visibility property/value You can turn the visibility of a layer off (edit the style) and then turn it on with a Behaviours (action), perhaps located on another object. An example is here.
Click here for a page with some basic page styling suggestions.