1. the environment (room)
2. performer / instrument
3. choice of microphone
4. choice of microphone pre-amplifier
5. microphone positioning
Now, click to watch our video at our sister site (or read on) ..

All of these factors have an important part to play in controlling the character of the sound captured by the recording device. There are others but they may be less significant ...
- If you are recording to tape you will need to consider the effect tape compression and noise reduction will have, especially the latter on high frequency sounds such as those produced by cymbals and triangles.
- The quality of the a to d converter. The differences between the quality of semi-pro and pro level converters (above consumer budget level) can be subtle and difficult for even professionals to identify in blind tests, but nevertheless, you may feel they are important.
- Cabling. Not likely to make much difference unless you have long cable runs in a live recording setup.
- The quality of microphone supports such as stands and shock mounts, and pop shields.
- Foldback headphone quality.
- Monitoring reverb quality. Foldback only reverb can significantly help performers when closed mic'd.
- The effects of any compression on the sound and dynamics of the audio, especially if it is audible to the performer.
1. The environment
The space
Unless you are close micing and eliminating ambience with screens and acoustic treatments, the reflected (reverb) sound in the room will be an important component of the sound being heard by the microphones.
Many engineers like to use both close and ambient mics, and record each to a separate track. Decisions on the balance of sound can then be made during mixdown. Others will know the precise sound they want from previous experience in the environment and commit a mix of mic feeds to stereo pairs. Many "old school" engineers are renowned for the skills they learned, and sound they are associated with, from a time (50s and 60s) when tracks were limited and it was not possible to record many separate feeds.
In the project studio, and where there is a favourable sounding room (ie when you stand in it and listen to the performer it sounds good), it is still a good idea to use both close and ambient/room micing techniques to give you maximum flexibility during mixdown.
If you are recording choral music in a church, the acoustics of the space will be absolutely essential to the sound and careful mic placement will be paramount.
There is more on room acoustics here.
Furniture
Don't forget to have appropriate furniture for your performer ... chair, stool, music stand, lighting etc.
Line of sight
Does your performer need to be in visual contact with other performers, a conductor, or the engineer and producer?
2. The performer / instrument
The best equipment carefully positioned in the best environment will not produce a good result if the performer or quality of the instrument is poor. Assuming your performer is appropriate and capable, you will need to consider the following ...
- instrument tuning
- age of reeds, skins, strings etc
- squeaks or noises from stands, keys, shoes etc
You will want to do everything possible to ensure the performer can produce the sound you have chosen them for.
3. Choice of microphone
There are many differing microphone models and designs available and not all will suit the performer / instrument. In all situations your choice will be limited to those at your disposal. Unless you already have a firm idea of what you want to achieve, and experience of the sound of a given mic with a given performer in the environment, it is a good idea to setup a number of mics and compare them whilst the performer is warming up. You will need to do this in such a way that you can switch between them without a long delay. 3-4 seconds will allow you to make a fair comparison. Ensure the levels are comparable.
If you performer cannot perform adequately with headphones, you may need to use a mic with a cardioid or hyper-cardoid response.
It is not possible to say what the best mic for a given job may be, but here are some choices that have worked for many successful recordings in the past ...
| Application | Mic choice |
|---|---|
| Vocal | Large diaphragm condenser |
| Electric guitar amp | Dynamic (eg Shure SM57, Sennheiser e606) |
| Snare drum (top) | Dynamic (eg Shure SM57) |
| Snare drum (bottom) | Small diaphragm condenser (eg AKG 451/CK1) |
| Kick drum | AKG D112 |
| Hi-hat | Small diaphragm condenser (eg AKG 451/CK1) |
| Acoustic guitar | Small or large diaphragm condenser |
| Saxophone | Large diaphragm condenser |
A transparent high quality mic pre - the Grace Designs M101

A celebrated mic pre with character - Neve 1073
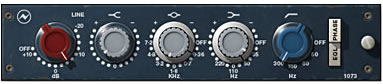
4. Choice of microphone pre-amplifier
Like an electric guitar and its amplifier, the paring of a microphone and pre-amplifier determines the dynamics, timbre and frequency response of the sound. The interaction of the electronics is an essential determinate of the results heard. A mic-pre's job is too amplify to line level the tiny signal coming from the mic. How it completes this delicate job, and the character it can add are extremely important.
Some designs (so called "transparent") seek to amplify the sound produced by the mic with as little distortion as possible, thereby preserving the essential character of the mic.
There are also mic-pre designs which intentionally "enhance" the sound of a mic by interacting with it and/or adding colouration (harmonics, warmth etc). Such designs are sometimes considered more important than mic choice.
However, unlike a guitar setup, differences in pre-amplifiers can be very subtle, so don't expect to always hear significant changes in the sound of a mic.
5. Microphone positioning
More important than choice of mic or pre-amp is where the mic is placed. For example, a mic pointed towards where the fretboard meets the body of an acoustic guitar will sound very different if you move it to point at the sound hole.
There is a huge amount to say about mic positioning, and we hope to cover the subject in future articles.