- PC ROM only
- Mac ROM only
- Mac and PC (ISO) ROM
- Custom Hybrid - Mac and PC (ISO) ROM with separate Mac and PC areas sharing some common data (such as video files)
- Enhanced and Mixed Mode - Mac and PC (ISO) ROM with the Mac and PC areas sharing some common data (such as video files) and an additional session of audio tracks for a CD player
The first 2 of these types are easy to create so need no special tutorials. This page discusses creating the 3rd, 4th and 5th type of disc with Roxio Toast software for Mac. PC users will need to find out how to achieve the same results with applications such as CD Everywhere.
Custom Hybrid, Enhanced and Mixed Mode CDs
Mac & PC (ISO) discs
It is simple to create a Mac & PC or ISO disc. All your files will be clearly visible on both platforms and you will not be able to arrange how they appear (special icons, window arrangements, background images etc).
These discs are ideal for simple cross platform projects which contain no elements exclusive to either Macs or PCs, such as web sites.
Custom hybrid discs
Custom Hybrid CDROMs have ...
a Mac only area (which won't be visible on a PC)
a PC only area (which will be visible on a Mac but can be clearly named as PC only)
a area of common shared data which can be shared between the Mac and PC areas
Typical applications for such a disc are website, Director and Flash projects. A Director project will typically have an application for the Mac, a .exe for the PC and some shared video and audio files. You can create a Custom Hybrid disc by following steps 1 to 8 opposite.
Enhanced discs
An Enhanced CDs contain 2 "sessions". One with audio tracks (for a CD or DVD player) and a second for the Mac and PC files. Roxio Toast can create an Enhanced CD although it is unclear how well these conform to "professional" Enhanced CD masters.
The "professional" Enhanced CD format usually requires a suitable specialist mastering system (we're NOT talking desktop Mac or PC systems here) to arrange the data files and audio tracks into a so called CD Extra file structure, or a QuAC file, before it can be burnt to a disc. A Mac will only see the HFS (Mac) data, a PC the ISO (PC) data, and an audio CD player will only recognise any audio tracks you have added.
Toast has an Enhanced CD mode. It would be ideal to be able to create an Enhanced CD with an audio session and a custom hybrid session with Toast. You could make a true cross platform interactive enhanced CD. BUT TOAST (version 6) WON'T LET YOU ANYMORE!!!! It can only make a disc with an audio session and a Mac and PC (ISO) session in either "Enhanced Audio CD" mode or "Mixed Mode CD" mode.
In version 5, Toast allowed you to create a Custom Hybrid disc and then "Append" an audio session to it ... but this fantastic feature appears to have been removed. ARRRRRGGGHHH!!!!
It appears that the Enhanced Audio CD mode in Toast is an incomplete compromise.
Mixed mode CDs
Because some older CDROM drives cannot recognise more than one session (Enhanced mode uses 2), another option for Macs and PCs is to create a Custom Hybrid format CD with audio tracks (so called "Mixed Mode"). Mix Mode discs are burnt in a single session. Again, Roxio Toast v5 could do this but v6 cannot!!!!
Toast v6 can only make a disc with an audio session and a Mac and PC (ISO) session in either "Enhanced Audio CD" mode or "Mixed Mode CD" mode.
The disadvantage of Mix Mode is that a CD player will see the Mac/ISO data as an additional audio track, usually track 1. Most CD players will recognise this extra track as computer ROM data and will not play it whilst others will attempt to play the track as sound, risking potential damage to a speaker system.
Creating a Custom Hybrid, Enhanced or Mixed Mode CDROM
You will need to burn your project on a Mac with Toast Titanium from Roxio. PC users will need to find out how to achieve the same results with applications such as CD Everywhere.
Step 1 - Media player installers
If you have used video and audio that requires QuickTime or Windows Media Player to playback, download the stand alone installers to include on your disc. Ensure you observe the licensing conditions.
Step 2 - Prepare your files
Collect all your files together in a folder on your hard drive. This might include ...
Mac & PC Projectors (Director)
Flash movies
HTML files
Folders containing movies
Folders containing media (video etc)
Media player installers
Read Me files
Autorun files
.ico files (icons)
Audio tracks
etc.
More on Director file organising here.
ISO naming You will need to ensure you have observed ISO naming conventions for your files if they are to work properly cross platform. You may be able to get away with longer file names and non-strict character sets but you will not be able to guarantee cross platform compatibility if you do.
Checking paths Ensure that the paths you have used to connect elements are relative to avoid problems with a file looking for a particular named hard drive.
If you have created a Director project on a PC, transfer all your files to a Mac. Your PC will almost certainly have used absolute path names (referring to absolute directories on your PC hard drive). You need to establish relative path links between your files before you can master your disc.
Open them in Director and reestablish any broken links using the "Browse" feature in the cast member info dialogue boxes. Navigate between movies re-establishing any broken links and saving your movies when prompted.
Step 3 - Test your project files
Once you have all your files assembled, test your project thoroughly to ensure everything works and links properly.
Step 4 - Create a disc image or TOAST temporary partition
You need to create either a disc image using the Mac OSX Disk Utility or a Temporary Partition from Toast's Utilities menu. It must be large enough to hold the Mac only files and all the common data and media files which will be shared with the PC version of your project.
If you are going to create a temporary partition with Toast ... quit all other active applications and boot Toast. Ensure File Sharing is disabled (you may have trouble making a temporary partition if it's on).
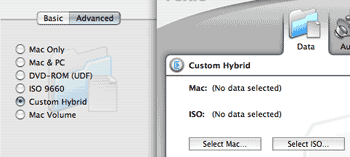
(Toast pre Titanium) From the "Format" menu select "Mac/ISO Hybrid". (Toast Titanium) select "Custom Hybrid" from the Advanced menu.

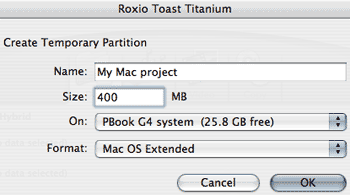
From the "Utilities" menu select "Create temporary Partition". Name it as you want the CD to appear when it mounts on your Mac desktop after burning (eg "My Project Mac"). Give it sufficient Size in Mb’s to hold your Mac and shared data. In the "On" pop up menu select the name of a hard drive partition with sufficient free space. Click OK. Toast will create a temporary partition (disk image) which will mount on the desktop.

Step 5 - Copy and layout your data
Now select the Mac only data (eg projector, Mac Read Me and QuickTime installer files) and the all the common data and media files and drag them to your new Disk Image or temporary partition. All your selected files will copied to it.
Then open the disk image or temporary partition window and arrange the window as you would like it to appear to your end user (eg perhaps with the projector, QuickTime installer and Read Me files visible but with the movie and media folders hidden). Replace the temporary partition icon with your own custom icon if you have made one.
Step 6 - Add the Mac files
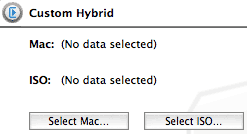
In Toast’s main window click on the "(Select) Mac" button and in the dialogue box that opens select the disk image or temporary partition by name.
Check "Optimise" on the fly, and in the pop up menu select "For speed" (pre Titanium only). Click OK.

Step 7 - Add PC files
In Toast’s main window click on the"(Select) ISO" button and drag all the PC only files (Projector, Read Me, Autorun, icon.bmp, PC QuickTime installer etc) into the dialogue box/window that opens. Also drag all the common data and media files into this box FROM THE Mac disc image or temporary partition window. Ensure that you do not drop them into an existing folder (such as a QuickTime installer folder). Toast recognise's that this data is a duplicate of that already placed in the Mac area and will only write it to the CD once.
To check, open the media and movie folders and you will see the files names are displayed in blue. Your Disc will appear titled "Untitled". Change it if you wish to something more meaningful such as "MY_CDROM".
Step 8 - ISO settings
Click on the "Settings tab". If your disc is going to contain only computer data (Custom Hybrid), select "CD-ROM" in the Format pop up menu. If you are going to add audio tracks (Toast v5 only) select "CD-ROM XA". Choose "Joliet " from the Naming drop down menu and click "Use Apple Extensions". Click on "Done".
If you have selected CD-ROM (Custom Hybrid), write the disc now.
STEP 9 - Adding audio tracks
If you wish to add "append" audio tracks (an audio session) to a Custom Hybrid disc, you will need to use Toast v5 (or possibly earlier) and have selected the CDROM-XA option in Step 8. Otherwise you will have to use the limited Mac & PC (ISO) data format and Enhanced Audio CD or Mixed Mode CD formats.
For Toast v5 Custom Hybrid discs .... Select "Audio" from the "Format" menu and click the "Audio" button that appears in Toasts main window. Locate and drag all you audio tracks into the data area and drag individual tracks up and down to arrange them in your preferred order. Select the "Other" button then alt (Option) click the record button and click "yes" in the dialogue box asking you if you wish to append audio and data together. Write the disc now.
TEST TEST TEST!!!!!
Test you disc in a Mac, PC and audio CD player. Oh, and you are using decent branded CD-R discs aren't you?
